About of Wundergraph.
https://neovisionconsulting.blogspot.com/2022/09/aboutofwundergraph.html
https://qiita.com/satto_sann/items/6f277c223d9acb250781
posted at
Introduction
This article is the 16th day of ZOZO Technologies Advent Calendar #2!
TL;DR
- Describe the benefits of using GraphQL over REST
- Work with Postgres using an ORM
- Describe schemas, mutations, and queries used in GraphQL
- Using Graphene to enable GraphQL on FastAPI
- Test a GraphQL API using Graphene and pytest
Why use GraphQL over REST
REST is the de facto standard for building WebAPIs. Design multiple endpoints (GET, POST, PUT, DELETE) for each CRUD operation. You can collect the information you want by accessing these endpoints.
For example, if you want to get specific user information along with posts and related comments, you need to call four different endpoints:
/users/<id>returns the initial user data/users/<id>/postsReturns all posts for a specific user/users/<post_id>/commentsReturns a list of comments per post/users/<id>/commentsReturns a list of comments per user
Each endpoint is simple, but it fetches more data than necessary until you get the information you want.
In a RESTful API, in order to obtain just the right amount of data, overfetching (fetching data that is not used) and underfetching (fetching the next endpoint because the data is insufficient) are possible. Common.
GraphQL, on the other hand, is a query language for retrieving data from APIs. Instead of having multiple endpoints, it's structured around a single endpoint that depends on what the client wants.
In GraphQL, construct queries like the following to retrieve user information, posts, and comments:
query {
  User(userId: 2){
    name
    posts {
      title
      comments {
        body
      }
    }
    comments {
      body
    }
  }
}
This allows you to get all the data you want in one request without overfetching.
Preparation
「fastapi-graphql」Create a project folder called
$ mkdir fastapi-graphql
$ cd fastapi-graphql
Next, create a new Python virtual environment and activate it.
$ python3.9 -m venv env
$ source env/bin/activate
Create requirements.txt to install dependencies.
fastapi==0.61.1
uvicorn==0.12.2
Install the package based on the created dependency file.
$ pip install -r requirements.txt
Next, create main.py in which simple API processing is written to check the operation.
from fastapi import FastAPI

app = FastAPI()


@app.get('/')
def ping():
    return {'ping': 'pong'}
launch the app
$ uvicorn main:app --reload
If everything works fine, you should be able to access the URL below.
http://localhost:8080/ping
It is OK if the result like this is output
{
    "ping": "pong"
}
In addition, FastAPI automatically generates API documentation using Swagger.
http://localhost:8000/docs
Postgres
Then download , install and start Postgres.
setting
Make settings for using PostgreSQL.
* Ubuntu is used as an example below. For other environments, please use the appropriate method.
Switch to account for Postgres
sudo -u postgres -i
User and password settings
createuser -d -U postgres -P db_user
db_userAssume the username is
Then enter the password when db_passwordprompted.
Create database
createdb db_name --encoding=UTF-8 --owner=db_user
db_nameCreate as database name .
Connection test
After executing the command below, if you enter the password db_passwordand confirm that you can enter the interactive mode without an error, the setting is complete.
$ psql -U db_user -h localhost -d db_name
Password for user db_user:
psql (13.1 (Ubuntu 13.1-1.pgdg20.04+1))
SSL connection (protocol: TLSv1.3, cipher: TLS_AES_256_GCM_SHA384, bits: 256, compression: off)
Type "help" for help.

db_name=>
exitYou can exit the mode with a command.
Python side settings
requirements.txtAdd the relevant dependent packages to the file to work with FastAPI .
fastapi==0.61.1
uvicorn==0.12.2
orator==0.9.9 # 追加
psycopg2-binary==2.8.6 # 追加
install
$ pip install -r requirements.txt
db.pyCreate a file to connect with the database .
from orator import DatabaseManager, Schema, Model

DATABASES = {
    "postgres": {
        "driver": "postgres",
        "host": "localhost",
        "database": "db_name",
        "user": "db_user",
        "password": "db_password",
        "prefix": "",
        "port": 5432
    }
}

db = DatabaseManager(DATABASES)
schema = Schema(db)
Model.set_connection_resolver(db)
Please change the following DB information as appropriate.
- Database name:
db_name - username:
db_user - password:
db_password
Create a model
Next, create models for users, posts, and comments.
User model
oratorUserCreate a model using the command
$ orator make:model User -m
-mis an option for creating migration files.
* At this stage, it has not been applied to the database yet.
After executing the command, it is successful if the following is displayed.
Model User successfully created.
Created migration: 2020_12_14_150844_create_users_table.py
Also, a folder is created in migrationsthe calendar directory.models
.
├── db.py
├── main.py
├── migrations
│   ├── 2020_12_14_150844_create_users_table.py
│   └── __init__.py
├── models
│   ├── __init__.py
│   └── user.py
├── requirements.txt
└── setting.sh
Add property to User model
Add the following items to the created migration file to give user information.
- name
- address
- phone number
- sex
The place to add it is table.increments('id')after.
from orator.migrations import Migration


class CreateUsersTable(Migration):

    def up(self):
        """
        Run the migrations.
        """
        with self.schema.create('users') as table:
            table.increments('id')
            table.string('name') # 追加
            table.text('address') # 追加
            table.string('phone_number', 11) # 追加
            table.enum('sex', ['male', 'female']) # 追加
            table.timestamps()

    def down(self):
        """
        Revert the migrations.
        """
        self.schema.drop('users')
Post model
Next, create a Post model.
$ orator make:model Post -m
Add property to Post model
PostAdd properties required for the model to the created migration file .
from orator.migrations import Migration


class CreatePostsTable(Migration):

    def up(self):
        """
        Run the migrations.
        """
        with self.schema.create('posts') as table:
            table.increments('id')
            table.integer('user_id').unsigned() # 追加
            table.foreign('user_id').references('id').on('users') # 追加
            table.string('title') # 追加
            table.text('body') # 追加
            table.timestamps()

    def down(self):
        """
        Revert the migrations.
        """
        self.schema.drop('posts')
Here, the columns below represent foreign keys. I am referring to theuserstable .id
table.integer('user_id').unsigned()
table.foreign('user_id').references('id').on('users')
CommentsModel
Finally, create the Comments model.
$ orator make:model Comments -m
Add property to Comments model
Add properties to the created migration file.
from orator.migrations import Migration


class CreateCommentsTable(Migration):

    def up(self):
        """
        Run the migrations.
        """
        with self.schema.create('comments') as table:
            table.increments('id')
            table.integer('user_id').unsigned().nullable() # 追加
            table.foreign('user_id').references('id').on('users') # 追加
            table.integer('post_id').unsigned().nullable() # 追加
            table.foreign('post_id').references('id').on('posts') # 追加
            table.text('body') # 追加
            table.timestamps()

    def down(self):
        """
        Revert the migrations.
        """
        self.schema.drop('comments')
Run migration
Execute the migration with the following command.
$ orator migrate -c db.py
yes/noyesThis will create a
database usersand a poststable .comments
Are you sure you want to proceed with the migration?  (yes/no) [no] yes

Migration table created successfully
[OK] Migrated 2020_12_14_150844_create_users_table
[OK] Migrated 2020_12_14_153522_create_posts_table
[OK] Migrated 2020_12_14_153529_create_comments_table
Relation settings
Next, ./modelsedit the file generated under the Usermodel and set the relationship between the model Postand the Commentsmodel.
User model
has_manyYou can build a one-to-many relationship by applying decorators.
The following shows that the Usermodel and the Postmodel and Commentsthe model are in a one-to-many relationship.
from orator.orm import has_many

from db import Model


class User(Model):

    @has_many
    def posts(self):
        from .post import Post

        return Post

    @has_many
    def comments(self):
        from .comment import Comments

        return Comments
Post model
CommentsSets the relationship with the model.
from orator.orm import has_many

from db import Model


class Post(Model):

    @has_many
    def comments(self):
        from .comment import Comments

        return Comments
CommentsModel
CommentsI don't set anything in the model.
from orator import Model


class Comments(Model):

    pass
GraphQL
To build a GraphQL API on top of FastAPI, you need to install Graphene .
Installing Graphene
GrapheneLet's add the package to requirement.txt .
fastapi==0.61.1
uvicorn==0.12.2
orator==0.9.9
psycopg2-binary==2.8.6
graphene==2.1.8 # 追加
Install.
$ pip install -r requirements.txt
What is a schema
A GraphQL schema is a representation of a GraphQL API specification.
A schema aggregates all relations and type definitions.
Create schema
schema.pyCreate in your project root .
import graphene


class Query(graphene.ObjectType):
    say_hello = graphene.String(name=graphene.String(default_value='Test Driven'))

    @staticmethod
    def resolve_say_hello(parent, info, name):
        return f'Hello {name}'
Integration with FastAPI
Update to load the schema created from FastAPI main.py.
import graphene
from fastapi import FastAPI
from starlette.graphql import GraphQLApp

from schema import Query

app = FastAPI()

app.add_route('/graphql', GraphQLApp(schema=graphene.Schema(query=Query)))

@app.get('/')
def ping():
    return {'ping': 'pong'}
Here we pass the schema to starletterthe GraphQLApp for working with GraphQl.
app.add_route('/graphql', GraphQLApp(schema=graphene.Schema(query=Query)))
Restart your server.
$ uvicorn main:app --reload
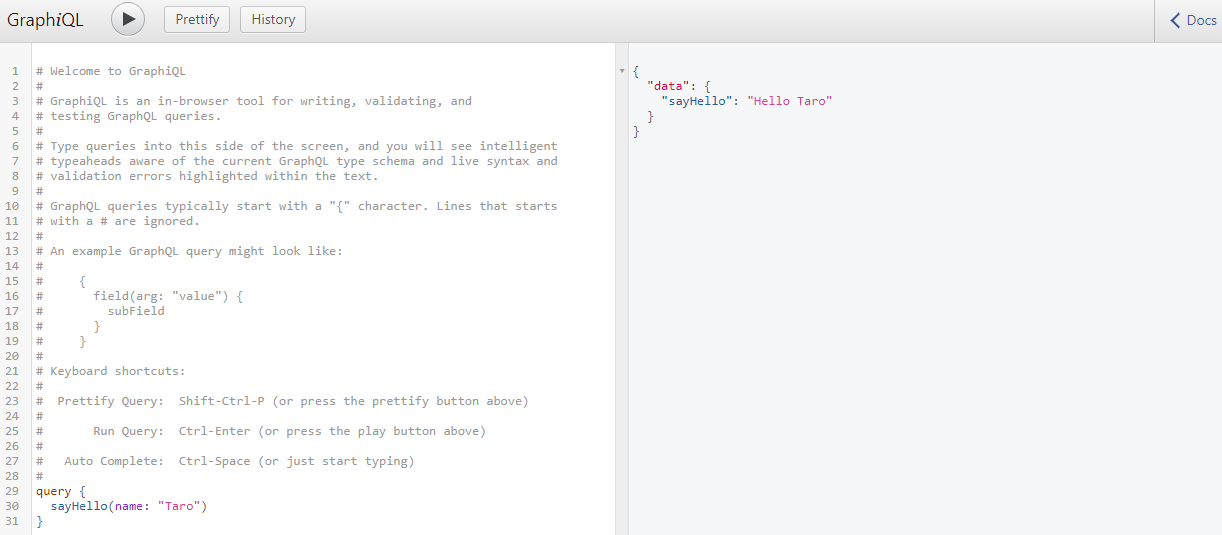
GraphiQL
By accessing the following, you can use GraphiQL that can execute GraphQL queries interactively.
http://localhost:8000/graphql
GraphQL query execution
Paste the following query into the left window and execute it.
query {
  sayHello(name: "Taro")
}
Make sure the following is returned.
{
  "data": {
    "sayHello": "Hello Taro"
  }
}
GraphQL Pydantic
Here we will create a Pydantic model to enable type hints and validation against queries in the GraphQL API.
For that , add the graphene-pydantic package torequirements.txt
fastapi==0.61.1
uvicorn==0.12.2
orator==0.9.9
psycopg2-binary==2.8.6
graphene==2.1.8
graphene-pydantic==0.1.0 # 追加
install
$ pip install -r requirements.txt
Create a file called pydantic model in your project root to serializers.pycreate pydantic models corresponding to your input and output objects.
from typing import List, Optional

from graphene_pydantic import PydanticInputObjectType, PydanticObjectType
from pydantic import BaseModel


class CommentsModel(BaseModel):
    id: int
    user_id: int
    post_id: int
    body: str


class PostModel(BaseModel):
    id: int
    user_id: int
    title: str
    body: str
    comments: Optional[List[CommentsModel]]


class UserModel(BaseModel):
    id: int
    name: str
    address: str
    phone_number: str
    sex: str
    posts: Optional[List[PostModel]]
    comments: Optional[List[CommentsModel]]


class CommentGrapheneModel(PydanticObjectType):
    class Meta:
        model = CommentsModel


class PostGrapheneModel(PydanticObjectType):
    class Meta:
        model = PostModel


class UserGrapheneModel(PydanticObjectType):
    class Meta:
        model = UserModel


class CommentGrapheneInputModel(PydanticInputObjectType):
    class Meta:
        model = CommentsModel
        exclude_fields = ('id', )


class PostGrapheneInputModel(PydanticInputObjectType):
    class Meta:
        model = PostModel
        exclude_fields = ('id', 'comments')


class UserGrapheneInputModel(PydanticInputObjectType):
    class Meta:
        model = UserModel
        exclude_fields = ('id', 'posts', 'comments')
The imported PydanticInputObjectTypeclasses and PydanticObjectTypeclasses are associated with the pydantic model for input and output respectively, Usermodel, Postmodel, Commentsmodel.
Here, Metaexclude_fields excludes the auto-generated IDs for each model from validation.
mutation
GraphQL uses mutations to modify data . It is primarily used when creating, updating, and deleting data.
Create object creation
Now let's use mutations to create User, Post, objects and store them in the database.Comment
schema.pyUpdate the file with the following code .
import graphene

from serializers import (
    UserGrapheneInputModel,
    UserGrapheneModel,
    PostGrapheneInputModel,
    PostGrapheneModel,
    CommentGrapheneInputModel,
    CommentGrapheneModel,
)

from models.comment import Comments
from models.post import Post
from models.user import User


class Query(graphene.ObjectType):
    say_hello = graphene.String(name=graphene.String(default_value='Test Driven'))

    @staticmethod
    def resolve_say_hello(parent, info, name):
        return f'Hello {name}'


class CreateUser(graphene.Mutation):
    class Arguments:
        user_details = UserGrapheneInputModel()

    Output = UserGrapheneModel

    @staticmethod
    def mutate(parent, info, user_details):
        user = User()
        user.name = user_details.name
        user.address = user_details.address
        user.phone_number = user_details.phone_number
        user.sex = user_details.sex

        user.save()

        return user


class CreatePost(graphene.Mutation):
    class Arguments:
        post_details = PostGrapheneInputModel()

    Output = PostGrapheneModel

    @staticmethod
    def mutate(parent, info, post_details):
        user = User.find_or_fail(post_details.user_id)
        post = Post()
        post.title = post_details.title
        post.body = post_details.body

        user.posts().save(post)

        return post


class CreateComment(graphene.Mutation):
    class Arguments:
        comment_details = CommentGrapheneInputModel()

    Output = CommentGrapheneModel

    @staticmethod
    def mutate(parent, info, comment_details):
        user = User.find_or_fail(comment_details.user_id)
        post = Post.find_or_fail(comment_details.post_id)

        comment = Comments()
        comment.body = comment_details.body

        user.comments().save(comment)
        post.comments().save(comment)

        return comment


class Mutation(graphene.ObjectType):
    create_user = CreateUser.Field()
    create_post = CreatePost.Field()
    create_comment = CreateComment.Field()
mutateI defined a method for each class ( CreateUser, CreatePost, ) that is applied when the mutation is invoked CreateComment.
Applying mutations
main.pyAlso update the file to handle the added mutations .
import graphene
from fastapi import FastAPI
from starlette.graphql import GraphQLApp

from schema import Query, Mutation

app = FastAPI()

app.add_route('/graphql', GraphQLApp(schema=graphene.Schema(query=Query, mutation=Mutation)))

@app.get('/')
def ping():
    return {'ping': 'pong'}
Execute createUser mutation
Restart Uvicorn, reload http://localhost:8000/graphql , paste the following query and execute createUser mutation.
mutation createUser {
  createUser(userDetails: {
    name: "Max Kun",
    address: "Tokyo",
    phoneNumber: "12345678",
    sex: "male"
  })
  {
    id
    name
    posts {
      body
      comments {
        body
      }
    }
  }
}
If you get a response like the one below, you're good to go.
{
  "data": {
    "createUser": {
      "id": 2,
      "name": "Max Kun",
      "posts": []
    }
  }
}

Execute createPost mutation
Next, createPostlet's execute a mutation and make a new post.
mutation createPost {
  createPost(postDetails: {
    userId: 2,
    title: "Hello",
    body: "This is the first post."
  })
  {
    id
  }
}
You will get the following response.
{
  "data": {
    "createPost": {
      "id": 1
    }
  }
}
Execute the createComments mutation
mutation createComment {
  createComment(commentDetails: {
    userId: 2,
    postId: 1,
    body: "This is a test comment."
  })
  {
    id
    body
  }
}
You will get a response like the one below.
{
  "data": {
    "createComment": {
      "id": 1,
      "body": "This is a test comment."
    }
  }
}
query
GraphQL makes use of queries to retrieve data as lists or single objects.
Create a query
Update schema.pythe class to get the user list as a list .Query
class Query(graphene.ObjectType):
    say_hello = graphene.String(name=graphene.String(default_value='Test Driven'))
    list_users = graphene.List(UserGrapheneModel)

    @staticmethod
    def resolve_say_hello(parent, info, name):
        return f'Hello {name}'

    @staticmethod
    def resolve_list_users(parent, info):
        return User.all()
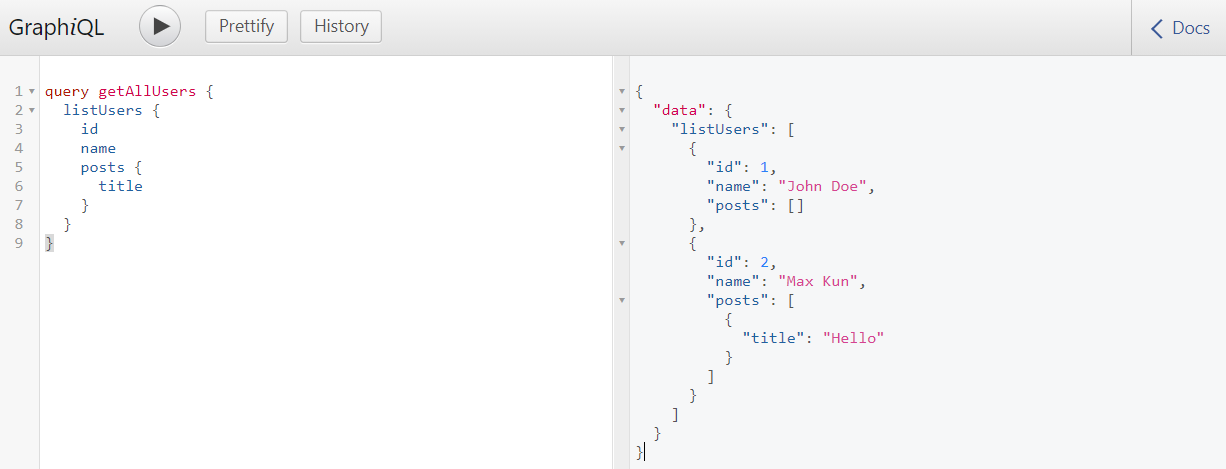
Get user list
Reload GraphiQL and run the following query to get the list of users.
query getAllUsers {
  listUsers {
    id
    name
    posts {
      title
    }
  }
}
result
{
  "data": {
    "listUsers": [
      {
        "id": 1,
        "name": "John Doe",
        "posts": []
      },
      {
        "id": 2,
        "name": "Max Kun",
        "posts": [
          {
            "title": "Hello"
          }
        ]
      }
    ]
  }
}
Get specific user information
Next, create a query that returns specific user information.
Update schema.pythe class as per the example .Query
class Query(graphene.ObjectType):
    say_hello = graphene.String(name=graphene.String(default_value='Test Driven'))
    list_users = graphene.List(UserGrapheneModel)
    get_single_user = graphene.Field(UserGrapheneModel, user_id=graphene.NonNull(graphene.Int))

    @staticmethod
    def resolve_say_hello(parent, info, name):
        return f'Hello {name}'

    @staticmethod
    def resolve_list_users(parent, info):
        return User.all()

    @staticmethod
    def resolve_get_single_user(parent, info, user_id):
        return User.find_or_fail(user_id)
Orator has a built-in find_or_fail function that raises an exception if an invalid id is passed.
successful query execution
Let's get the user information by specifying the correct user ID.
query getUser {
  getSingleUser(userId: 2) {
    name
    posts {
      title
      comments {
        body
      }
    }
    comments {
      body
    }
  }
}
Result: I got the specific user information and the list of posts and comments as intended.
{
  "data": {
    "getSingleUser": {
      "name": "Max Kun",
      "posts": [
        {
          "title": "Hello",
          "comments": [
            {
              "body": "This is a test comment."
            }
          ]
        }
      ],
      "comments": [
        {
          "body": "This is a test comment."
        }
      ]
    }
  }
}

If you don't want post or comment information, modify your query like this:
query getUser {
  getSingleUser(userId: 2) {
    name
  }
}
Result: Simple user information.
{
  "data": {
    "getSingleUser": {
      "name": "Max Kun"
    }
  }
}

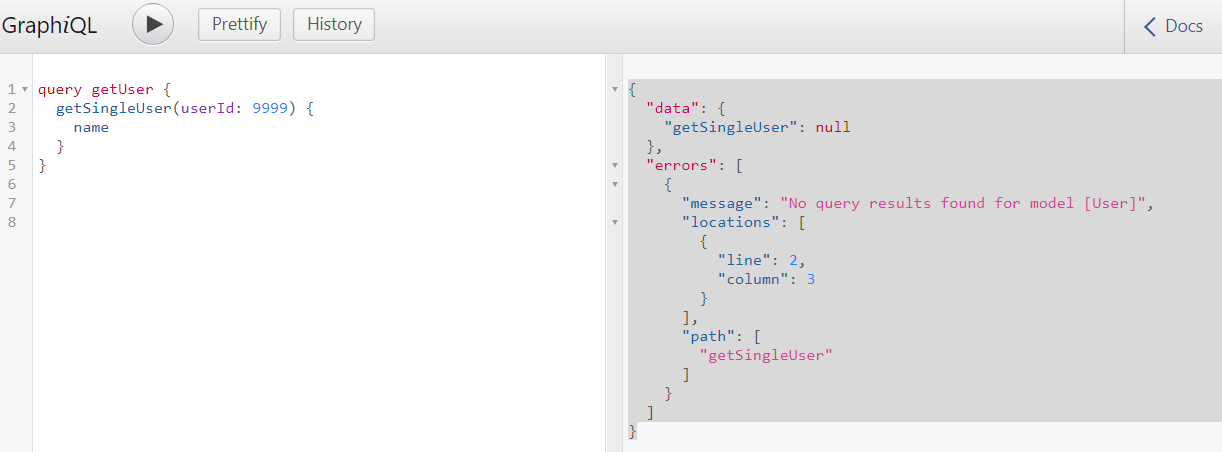
If you specify an incorrect user ID
What happens if you run a query with the wrong user id?
query getUser {
  getSingleUser(userId: 9999) {
    name
  }
}
Result: An error is returned.
As mentioned earlier, Orator has a built-in find_or_fail function that raises an exception if an invalid ID is passed.
{
  "data": {
    "getSingleUser": null
  },
  "errors": [
    {
      "message": "No query results found for model [User]",
      "locations": [
        {
          "line": 2,
          "column": 3
        }
      ],
      "path": [
        "getSingleUser"
      ]
    }
  ]
}
test
Graphene provides a test client for testing Graphene apps.
Preparation
Since we use pytestrequirements.txt , we need to add a dependency to
fastapi==0.61.1
uvicorn==0.12.2
orator==0.9.9
psycopg2-binary==2.8.6
graphene==2.1.8
graphene-pydantic==0.1.0
pytest==6.1.1 # 追加
install
$ pip install -r requirements.txt
Create test pretreatment
「test」Next, create a folder in the project root conftest.pyand add files under it.
Here, describe the processing you want to execute before running the test.
import graphene
import pytest
from graphene.test import Client
from orator import DatabaseManager, Model, Schema
from orator.migrations import DatabaseMigrationRepository, Migrator

from models.comment import Comments
from models.post import Post
from models.user import User
from schema import Query, Mutation


@pytest.fixture(autouse=True)
def setup_database():
    DATABASES = {
        "sqlite": {
            "driver": "sqlite",
            "database": "test.db"
        }
    }

    db = DatabaseManager(DATABASES)
    Schema(db)

    Model.set_connection_resolver(db)

    repository = DatabaseMigrationRepository(db, "migrations")
    migrator = Migrator(repository, db)

    if not repository.repository_exists():
        repository.create_repository()

    migrator.reset("migrations")
    migrator.run("migrations")


@pytest.fixture(scope="module")
def client():
    client = Client(schema=graphene.Schema(query=Query, mutation=Mutation))
    return client


@pytest.fixture(scope="function")
def user():
    user = User()
    user.name = "John Doe"
    user.address = "United States of Nigeria"
    user.phone_number = 123456789
    user.sex = "male"
    user.save()

    return user


@pytest.fixture(scope="function")
def post(user):
    post = Post()
    post.title = "Test Title"
    post.body = "this is the post body and can be as long as possible"

    user.posts().save(post)
    return post


@pytest.fixture(scope="function")
def comment(user, post):
    comment = Comments()
    comment.body = "This is a comment body"

    user.comments().save(comment)
    post.comments().save(comment)

    return comment
Below are the details of the code.
About database fixtures
Here, we define database settings and tests for applying migrations.
@pytest.fixture(autouse=True)
def setup_database():
    DATABASES = {
        "sqlite": {
            "driver": "sqlite",
            "database": "test.db"
        }
    }

    db = DatabaseManager(DATABASES)
    Schema(db)

    Model.set_connection_resolver(db)

    repository = DatabaseMigrationRepository(db, "migrations")
    migrator = Migrator(repository, db)

    if not repository.repository_exists():
        repository.create_repository()

    migrator.reset("migrations")
    migrator.run("migrations")
@pytest.fixtureBy specifying autouse in the decorator argument, Trueyou can define a function that will be executed before the test function is executed.
setup_databaseThe function will be called before each test function execution to ensure that the database is initialized.
About fixtures for Graphene clients
A fixture for creating Graphene test clients.
@pytest.fixture(scope="module")
def client():
    client = Client(schema=graphene.Schema(query=Query, mutation=Mutation))
    return client
Arguments scopecan control the granularity at which fixtures are executed.
| scope name | execution granularity |
|---|---|
| function | Run once per test case (default) |
| class | Run once for entire test class |
| modules | Run once for entire test file |
| sessions | Only run once for the entire test |
About other fixtures
A fixture for creating user, post and comment information.
@pytest.fixture(scope="function")
def user():
    user = User()
    user.name = "John Doe"
    user.address = "United States of Nigeria"
    user.phone_number = 123456789
    user.sex = "male"
    user.save()

    return user


@pytest.fixture(scope="function")
def post(user):
    post = Post()
    post.title = "Test Title"
    post.body = "this is the post body and can be as long as possible"

    user.posts().save(post)
    return post


@pytest.fixture(scope="function")
def comment(user, post):
    comment = Comments()
    comment.body = "This is a comment body"

    user.comments().save(comment)
    post.comments().save(comment)

    return comment
Create a test
test_query.pyCreate a test file called and add a test for your user model like this:
def test_create_user(client):
    query = """
    mutation {
        createUser(userDetails: {
            name: "Test User",
            sex: "male",
            address: "My Address",
            phoneNumber: "123456789",
        })
        {
            id
            name
            address
        }
    }
    """

    result = client.execute(query)
    assert result['data']['createUser']['id'] == 1
    assert result['data']['createUser']['name'] == "Test User"


def test_get_user_list(client, user):
    query = """
    query {
        listUsers {
            name
            address
        }
    }
    """

    result = client.execute(query)
    assert type(result['data']['listUsers']) == list


def test_get_single_user(client, user):
    query = """
    query {
        getSingleUser(userId: %s){
            address
        }
    }
    """ % user.id
    result = client.execute(query)

    assert result['data']['getSingleUser'] is not None
    assert result['data']['getSingleUser']['address'] == user.address
test run
Run the tests with pytest using the following command:
$ python -m pytest -s test
After executing the command, all test items are executed.
================================================ test session starts ================================================
platform linux -- Python 3.9.1, pytest-6.1.1, py-1.10.0, pluggy-0.13.1
rootdir: /home/taro/Workspace/Python/fastapi-graphql
collected 3 items

test/test_query.py ...
=========================================== 3 passed in 0.51s =======================================================
Passed the test successfully 🎉🎉
summary
We showed you how to develop and test GraphQLAPI using FastAPI, Orator ORM and pytest.
Since FastAPI provides type hints and validation as standard, it seems to be compatible with GraphQL API development using Pydantic.
Tomorrow is an article by ZOZO Technologies Advent Calendar #2 @yokawasa ! looking forward to!
Register as a new user and use Qiita more conveniently
- You can follow users and tags
- you can stock useful information
- You can make editorial suggestions for articles


0 コメント:
コメントを投稿