https://qiita.com/satto_sann/items/6f277c223d9acb250781
Wundergraphについて。
posted at
はじめに
この記事はZOZOテクノロジーズ アドベントカレンダー#2 16日目の記事です!
TL;DR
- REST上でGraphQLを使用するメリットを説明
- ORMを使用してPostgresを操作
- GraphQLで用いられるスキーマ、ミューテーション、クエリについて説明
- Grapheneを使用してGraphQLをFastAPI上で使えるようにする
- Grapheneとpytestを使用してGraphQL APIをテストする
なぜREST上でGraphQLを使用するか
RESTは、WebAPIを構築するためのデファクトスタンダードです。CRUD操作ごとに複数のエンドポイント(GET、POST、PUT、DELETE)を設計します。これらのエンドポイントにアクセスすることによって欲しい情報を収集することができます。
例えば、特定のユーザー情報を投稿や関連するコメントとともに取得する場合は、次の4つの異なるエンドポイントを呼び出す必要があります。
/users/<id>初期ユーザーデータを返します/users/<id>/posts特定のユーザーの全投稿を返します/users/<post_id>/comments投稿ごとのコメントリストを返します/users/<id>/commentsユーザーごとのコメントリストを返します
一つ一つのエンドポイントは単純ですが、欲しい情報を手に入れるまで、必要以上にデータを取得してしまいます。
RESTful APIでは、過不足なくデータを取得するために、リクエストのオーバーフェッチ(利用しないデータが含むフェッチ)とアンダーフェッチ(データが不十分なフェッチであるため次のエンドポイントをフェッチ)を行うことが一般的です。
一方で、GraphQLは、APIからデータを取得するためのクエリ言語です。複数のエンドポイントを持つ代わりに、クライアントが望むものに依存する単一のエンドポイントを中心に構成されています。
GraphQLでは、次のようなクエリを構成して、ユーザーの情報、投稿、コメントを取得します。
query {
  User(userId: 2){
    name
    posts {
      title
      comments {
        body
      }
    }
    comments {
      body
    }
  }
}
これにより、オーバーフェッチせずに1つのリクエストですべての欲しいデータを取得することができます。
準備
「fastapi-graphql」というプロジェクトフォルダを作成します。
$ mkdir fastapi-graphql
$ cd fastapi-graphql
次に、新しいPythonの仮想環境を作成して有効化します。
$ python3.9 -m venv env
$ source env/bin/activate
依存関係をインストールするためにrequirements.txtを作成します。
fastapi==0.61.1
uvicorn==0.12.2
作成した依存関係ファイルに基づきパッケージのインストールを行います。
$ pip install -r requirements.txt
次に、動作確認を行うために簡単なAPI処理を書いたmain.pyを作成します。
from fastapi import FastAPI

app = FastAPI()


@app.get('/')
def ping():
    return {'ping': 'pong'}
アプリを起動します
$ uvicorn main:app --reload
正常に動作していれば、下記URLにアクセス出来るはずです。
http://localhost:8080/ping
このような結果が出力されていればOKです
{
    "ping": "pong"
}
また、FastAPIでは、SwaggerによるAPIドキュメントが自動で生成されます。
http://localhost:8000/docs
Postgres
次に、Postgresをダウンロード、インストールして起動します。
設定
PostgreSQLを使うための設定を行います。
※ 下記では、Ubuntuを例にあげます。他の環境の方は、適宜あった方法で設定してください。
Postgres用のアカウントに切り替える
sudo -u postgres -i
ユーザとパスワードの設定
createuser -d -U postgres -P db_user
ユーザ名はdb_userとします。
次に、パスワードを聞かれるのでdb_passwordと入力します。
データベースの作成
createdb db_name --encoding=UTF-8 --owner=db_user
データベース名db_nameとして作成します。
接続テスト
下記コマンド実行後、パスワードdb_passwordを入力してエラーが発生せず、インタラクティブモードに入れることを確認できれば設定完了です。
$ psql -U db_user -h localhost -d db_name
Password for user db_user:
psql (13.1 (Ubuntu 13.1-1.pgdg20.04+1))
SSL connection (protocol: TLSv1.3, cipher: TLS_AES_256_GCM_SHA384, bits: 256, compression: off)
Type "help" for help.

db_name=>
exitコマンドでモードを抜けることができます。
Python側の設定
FastAPIと連携するために関連する依存パッケージをrequirements.txtファイルに追加します。
fastapi==0.61.1
uvicorn==0.12.2
orator==0.9.9 # 追加
psycopg2-binary==2.8.6 # 追加
インストール
$ pip install -r requirements.txt
データベースと接続するためのdb.pyファイルを作成します。
from orator import DatabaseManager, Schema, Model

DATABASES = {
    "postgres": {
        "driver": "postgres",
        "host": "localhost",
        "database": "db_name",
        "user": "db_user",
        "password": "db_password",
        "prefix": "",
        "port": 5432
    }
}

db = DatabaseManager(DATABASES)
schema = Schema(db)
Model.set_connection_resolver(db)
下記DB情報は適宜変更してください。
- データベース名:
db_name - ユーザー名:
db_user - パスワード:
db_password
モデルの作成
次に、ユーザー、投稿、コメントのモデルを作成します。
Userモデル
oratorコマンドを使って、Userモデルを作成します。
$ orator make:model User -m
-mはマイグレーション用ファイル作成のためのオプションです。
※ この段階では、まだデータベースに適用されていません。
コマンド実行後、次のように表示されれば成功です。
Model User successfully created.
Created migration: 2020_12_14_150844_create_users_table.py
また、カレンドディレクトリにmigrations及びmodelsフォルダが作成されます。
.
├── db.py
├── main.py
├── migrations
│   ├── 2020_12_14_150844_create_users_table.py
│   └── __init__.py
├── models
│   ├── __init__.py
│   └── user.py
├── requirements.txt
└── setting.sh
Userモデルにプロパティーを追加
ユーザ情報を付与するために、作成されたマイグレーションファイルに次の項目を追加します。
- 名前
- 住所
- 電話番号
- 性別
追加する場所は、table.increments('id')の後です。
from orator.migrations import Migration


class CreateUsersTable(Migration):

    def up(self):
        """
        Run the migrations.
        """
        with self.schema.create('users') as table:
            table.increments('id')
            table.string('name') # 追加
            table.text('address') # 追加
            table.string('phone_number', 11) # 追加
            table.enum('sex', ['male', 'female']) # 追加
            table.timestamps()

    def down(self):
        """
        Revert the migrations.
        """
        self.schema.drop('users')
Postモデル
次に、Postモデルを作成します。
$ orator make:model Post -m
Postモデルにプロパティーを追加
作成されたマイグレーションファイルに対して、Postモデルに必要なプロパティを追加します。
from orator.migrations import Migration


class CreatePostsTable(Migration):

    def up(self):
        """
        Run the migrations.
        """
        with self.schema.create('posts') as table:
            table.increments('id')
            table.integer('user_id').unsigned() # 追加
            table.foreign('user_id').references('id').on('users') # 追加
            table.string('title') # 追加
            table.text('body') # 追加
            table.timestamps()

    def down(self):
        """
        Revert the migrations.
        """
        self.schema.drop('posts')
ここで、下記のカラムは外部キーを表しています。usersテーブルのidを参照しています。
table.integer('user_id').unsigned()
table.foreign('user_id').references('id').on('users')
Commentsモデル
最後に、Commentsモデルを作成します。
$ orator make:model Comments -m
Commentsモデルにプロパティーを追加
作成されたマイグレーションファイルにプロパティを追加します。
from orator.migrations import Migration


class CreateCommentsTable(Migration):

    def up(self):
        """
        Run the migrations.
        """
        with self.schema.create('comments') as table:
            table.increments('id')
            table.integer('user_id').unsigned().nullable() # 追加
            table.foreign('user_id').references('id').on('users') # 追加
            table.integer('post_id').unsigned().nullable() # 追加
            table.foreign('post_id').references('id').on('posts') # 追加
            table.text('body') # 追加
            table.timestamps()

    def down(self):
        """
        Revert the migrations.
        """
        self.schema.drop('comments')
マイグレーションを実行
下記コマンドでマイグレーションを実行します。
$ orator migrate -c db.py
yes/noで聞かれるので、yesと答えましょう
これで、データベースにusers、postsおよびcommentsテーブルが作成されます。
Are you sure you want to proceed with the migration?  (yes/no) [no] yes

Migration table created successfully
[OK] Migrated 2020_12_14_150844_create_users_table
[OK] Migrated 2020_12_14_153522_create_posts_table
[OK] Migrated 2020_12_14_153529_create_comments_table
リレーションの設定
次に、./models配下に生成されたファイルを編集してUserモデルとPost及びCommentsモデルの関係を設定します。
Userモデル
has_manyデコレータを適用することで、一対多の関係を構築することができます。
下記では、UserモデルとPostモデル及びCommentsモデルは一対多の関係であることを表しています。
from orator.orm import has_many

from db import Model


class User(Model):

    @has_many
    def posts(self):
        from .post import Post

        return Post

    @has_many
    def comments(self):
        from .comment import Comments

        return Comments
Postモデル
Commentsモデルとの関係を設定します。
from orator.orm import has_many

from db import Model


class Post(Model):

    @has_many
    def comments(self):
        from .comment import Comments

        return Comments
Commentsモデル
Commentsモデルでは何も設定しません。
from orator import Model


class Comments(Model):

    pass
GraphQL
FastAPI上でGraphQL APIを構築するには、Grapheneをインストールする必要があります。
Grapheneのインストール
requirement.txtにGrapheneパッケージを追加しましょう。
fastapi==0.61.1
uvicorn==0.12.2
orator==0.9.9
psycopg2-binary==2.8.6
graphene==2.1.8 # 追加
インストールします。
$ pip install -r requirements.txt
スキーマーとは
GraphQLのスキーマーとは、GraphQL APIの仕様を表現するものです。
スキーマーには、すべてのリレーションや型定義が集約されます。
スキーマーの作成
プロジェクトルートにschema.pyを作成します。
import graphene


class Query(graphene.ObjectType):
    say_hello = graphene.String(name=graphene.String(default_value='Test Driven'))

    @staticmethod
    def resolve_say_hello(parent, info, name):
        return f'Hello {name}'
FastAPIとの連携
FastAPIから作成したスキーマーを読み込むためにmain.pyを更新します。
import graphene
from fastapi import FastAPI
from starlette.graphql import GraphQLApp

from schema import Query

app = FastAPI()

app.add_route('/graphql', GraphQLApp(schema=graphene.Schema(query=Query)))

@app.get('/')
def ping():
    return {'ping': 'pong'}
ここで、GraphQlを扱うためにstarletterのGraphQLAppに対してスキーマーを渡しています。
app.add_route('/graphql', GraphQLApp(schema=graphene.Schema(query=Query)))
サーバを再起動します。
$ uvicorn main:app --reload
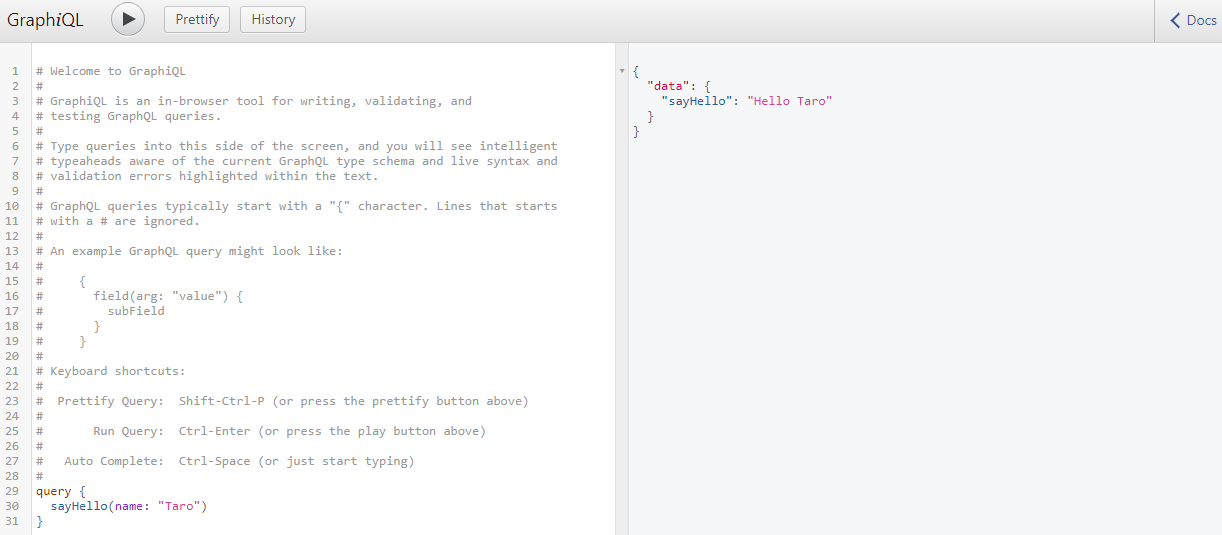
GraphiQL
下記にアクセスすることで、インタラクティブにGraphQLクエリを実行できるGraphiQLが利用できます。
http://localhost:8000/graphql
GraphQLクエリの実行
左側のウインドウに、下記クエリを貼り付け実行します。
query {
  sayHello(name: "Taro")
}
下記が返ってくることを確認しましょう。
{
  "data": {
    "sayHello": "Hello Taro"
  }
}
GraphQL Pydantic
ここでは、Pydanticモデルを作成して、GraphQL APIにおける型ヒントやクエリに対するバリデーションを出来るようにします。
そのために、graphene-pydanticパッケージをrequirements.txtに追加します。
fastapi==0.61.1
uvicorn==0.12.2
orator==0.9.9
psycopg2-binary==2.8.6
graphene==2.1.8
graphene-pydantic==0.1.0 # 追加
インストール
$ pip install -r requirements.txt
プロジェクトルートにserializers.pyというファイルを作成して、入力オブジェクトと出力オブジェクトに対応するpydanticモデルを作成します。
from typing import List, Optional

from graphene_pydantic import PydanticInputObjectType, PydanticObjectType
from pydantic import BaseModel


class CommentsModel(BaseModel):
    id: int
    user_id: int
    post_id: int
    body: str


class PostModel(BaseModel):
    id: int
    user_id: int
    title: str
    body: str
    comments: Optional[List[CommentsModel]]


class UserModel(BaseModel):
    id: int
    name: str
    address: str
    phone_number: str
    sex: str
    posts: Optional[List[PostModel]]
    comments: Optional[List[CommentsModel]]


class CommentGrapheneModel(PydanticObjectType):
    class Meta:
        model = CommentsModel


class PostGrapheneModel(PydanticObjectType):
    class Meta:
        model = PostModel


class UserGrapheneModel(PydanticObjectType):
    class Meta:
        model = UserModel


class CommentGrapheneInputModel(PydanticInputObjectType):
    class Meta:
        model = CommentsModel
        exclude_fields = ('id', )


class PostGrapheneInputModel(PydanticInputObjectType):
    class Meta:
        model = PostModel
        exclude_fields = ('id', 'comments')


class UserGrapheneInputModel(PydanticInputObjectType):
    class Meta:
        model = UserModel
        exclude_fields = ('id', 'posts', 'comments')
インポートしたPydanticInputObjectTypeクラス及びPydanticObjectTypeクラスは、入力と出力それぞれpydanticモデルと紐付け、Userモデル、Postモデル、Commentsモデルに対応づけしています。
ここで、Metaのexclude_fieldsでは、それぞれのモデルで自動生成されたIDをバリデーションから除外するようにしています。
ミューテーション
GraphQLでは、データを変更するためにミューテーションが使用されます。主に、データの作成、更新、および削除を行う際に使用されます。
Createオブジェクトの作成
次は、ミューテーションを使用して、User、Post、Commentオブジェクトを作成し、データベースに保存してみましょう。
次のコードでschema.pyファイルを更新します。
import graphene

from serializers import (
    UserGrapheneInputModel,
    UserGrapheneModel,
    PostGrapheneInputModel,
    PostGrapheneModel,
    CommentGrapheneInputModel,
    CommentGrapheneModel,
)

from models.comment import Comments
from models.post import Post
from models.user import User


class Query(graphene.ObjectType):
    say_hello = graphene.String(name=graphene.String(default_value='Test Driven'))

    @staticmethod
    def resolve_say_hello(parent, info, name):
        return f'Hello {name}'


class CreateUser(graphene.Mutation):
    class Arguments:
        user_details = UserGrapheneInputModel()

    Output = UserGrapheneModel

    @staticmethod
    def mutate(parent, info, user_details):
        user = User()
        user.name = user_details.name
        user.address = user_details.address
        user.phone_number = user_details.phone_number
        user.sex = user_details.sex

        user.save()

        return user


class CreatePost(graphene.Mutation):
    class Arguments:
        post_details = PostGrapheneInputModel()

    Output = PostGrapheneModel

    @staticmethod
    def mutate(parent, info, post_details):
        user = User.find_or_fail(post_details.user_id)
        post = Post()
        post.title = post_details.title
        post.body = post_details.body

        user.posts().save(post)

        return post


class CreateComment(graphene.Mutation):
    class Arguments:
        comment_details = CommentGrapheneInputModel()

    Output = CommentGrapheneModel

    @staticmethod
    def mutate(parent, info, comment_details):
        user = User.find_or_fail(comment_details.user_id)
        post = Post.find_or_fail(comment_details.post_id)

        comment = Comments()
        comment.body = comment_details.body

        user.comments().save(comment)
        post.comments().save(comment)

        return comment


class Mutation(graphene.ObjectType):
    create_user = CreateUser.Field()
    create_post = CreatePost.Field()
    create_comment = CreateComment.Field()
ミューテーションが呼び出されたときに適用されるmutateメソッドをクラス(CreateUser、CreatePost、CreateComment)ごとに定義しました。
ミューテーションの適用
追加したミューテーションを扱うために、main.pyファイルも更新します。
import graphene
from fastapi import FastAPI
from starlette.graphql import GraphQLApp

from schema import Query, Mutation

app = FastAPI()

app.add_route('/graphql', GraphQLApp(schema=graphene.Schema(query=Query, mutation=Mutation)))

@app.get('/')
def ping():
    return {'ping': 'pong'}
createUserミューテーションの実行
Uvicornを再起動し、http://localhost:8000/graphql をリロード、下記クエリを貼り付けcreateUserのミューテーションを実行してみましょう。
mutation createUser {
  createUser(userDetails: {
    name: "Max Kun",
    address: "Tokyo",
    phoneNumber: "12345678",
    sex: "male"
  })
  {
    id
    name
    posts {
      body
      comments {
        body
      }
    }
  }
}
下記のようなレスポンスが得られれば成功です。
{
  "data": {
    "createUser": {
      "id": 2,
      "name": "Max Kun",
      "posts": []
    }
  }
}

createPostミューテーションの実行
次は,createPostミューテーションを実行して、新規投稿を行ってみましょう。
mutation createPost {
  createPost(postDetails: {
    userId: 2,
    title: "Hello",
    body: "This is the first post."
  })
  {
    id
  }
}
下記レスポンスが得られます。
{
  "data": {
    "createPost": {
      "id": 1
    }
  }
}
createCommentsミューテーションの実行
mutation createComment {
  createComment(commentDetails: {
    userId: 2,
    postId: 1,
    body: "This is a test comment."
  })
  {
    id
    body
  }
}
下記のようなレスポンスが返ってきます。
{
  "data": {
    "createComment": {
      "id": 1,
      "body": "This is a test comment."
    }
  }
}
クエリ
GraphQLでは、データをリストまたは単一のオブジェクトとして取得するために、クエリを利用します。
クエリの作成
ユーザ一覧をリストとして取得するためにschema.pyのQueryクラスを更新します。
class Query(graphene.ObjectType):
    say_hello = graphene.String(name=graphene.String(default_value='Test Driven'))
    list_users = graphene.List(UserGrapheneModel)

    @staticmethod
    def resolve_say_hello(parent, info, name):
        return f'Hello {name}'

    @staticmethod
    def resolve_list_users(parent, info):
        return User.all()
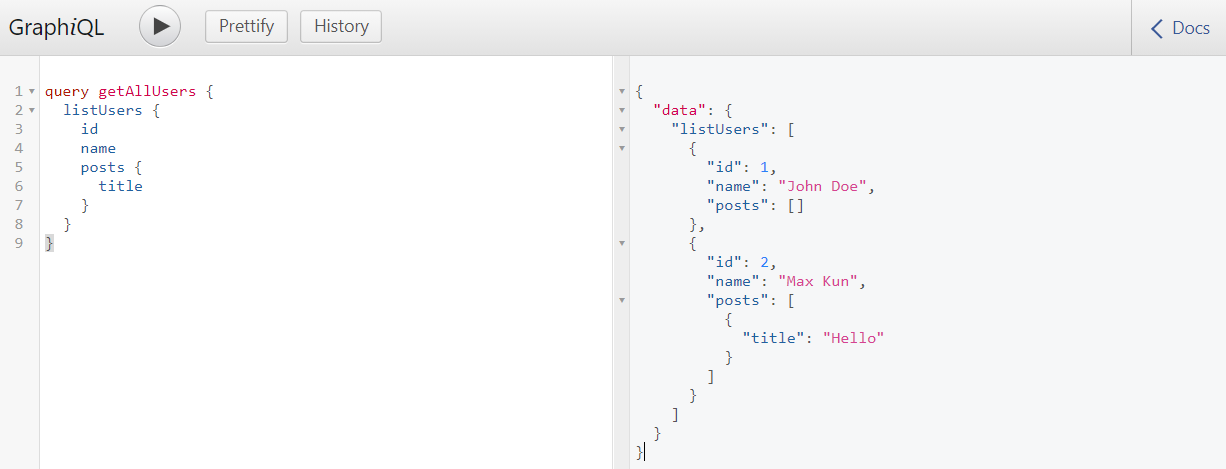
ユーザ一覧の取得
GraphiQLをリロードし、次のクエリを実行して、ユーザ一覧を取得します。
query getAllUsers {
  listUsers {
    id
    name
    posts {
      title
    }
  }
}
結果
{
  "data": {
    "listUsers": [
      {
        "id": 1,
        "name": "John Doe",
        "posts": []
      },
      {
        "id": 2,
        "name": "Max Kun",
        "posts": [
          {
            "title": "Hello"
          }
        ]
      }
    ]
  }
}
特定のユーザ情報の取得
次に、特定のユーザ情報を返すクエリを作成します。
例のごとく、schema.pyのQueryクラスを更新します。
class Query(graphene.ObjectType):
    say_hello = graphene.String(name=graphene.String(default_value='Test Driven'))
    list_users = graphene.List(UserGrapheneModel)
    get_single_user = graphene.Field(UserGrapheneModel, user_id=graphene.NonNull(graphene.Int))

    @staticmethod
    def resolve_say_hello(parent, info, name):
        return f'Hello {name}'

    @staticmethod
    def resolve_list_users(parent, info):
        return User.all()

    @staticmethod
    def resolve_get_single_user(parent, info, user_id):
        return User.find_or_fail(user_id)
Oratorには組み込みのfind_or_fail関数があり、無効なIDが渡された場合に例外が発生します。
正常なクエリの実行
正しいユーザIDを指定してユーザ情報を取得してみましょう。
query getUser {
  getSingleUser(userId: 2) {
    name
    posts {
      title
      comments {
        body
      }
    }
    comments {
      body
    }
  }
}
結果:意図した通り特定のユーザ情報と投稿及びコメントのリストが得られました。
{
  "data": {
    "getSingleUser": {
      "name": "Max Kun",
      "posts": [
        {
          "title": "Hello",
          "comments": [
            {
              "body": "This is a test comment."
            }
          ]
        }
      ],
      "comments": [
        {
          "body": "This is a test comment."
        }
      ]
    }
  }
}

投稿やコメント情報が必要ない場合は、次のようにクエリを修正します。
query getUser {
  getSingleUser(userId: 2) {
    name
  }
}
結果:シンプルにユーザ情報だけが得られました。
{
  "data": {
    "getSingleUser": {
      "name": "Max Kun"
    }
  }
}

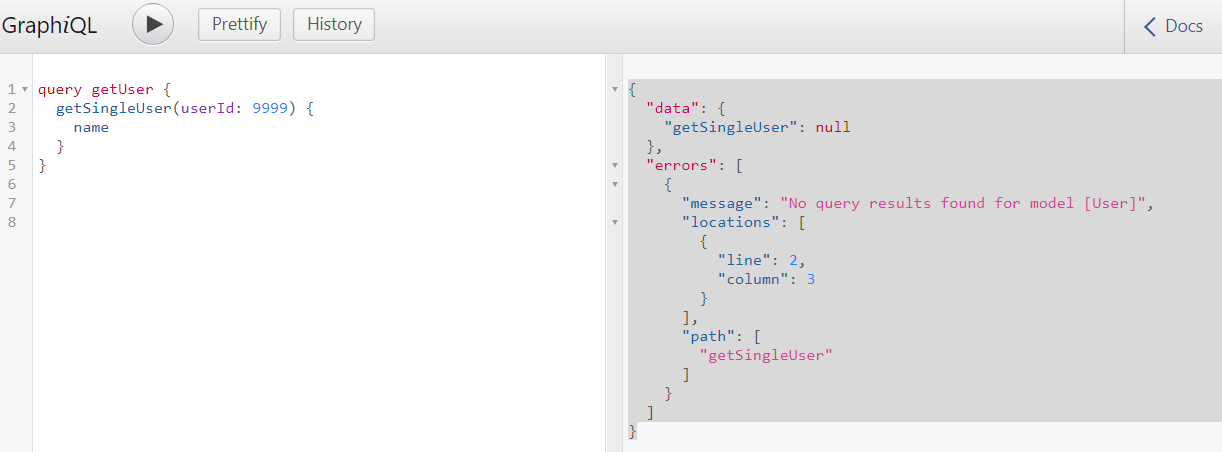
誤ったユーザIDを指定した場合
誤ったユーザIDを指定してクエリを実行した場合はどうなるのでしょうか?
query getUser {
  getSingleUser(userId: 9999) {
    name
  }
}
結果:エラーが返ってきます。
前述の通り、Oratorには組み込みのfind_or_fail関数があり、無効なIDが渡された場合には例外が発生します。
{
  "data": {
    "getSingleUser": null
  },
  "errors": [
    {
      "message": "No query results found for model [User]",
      "locations": [
        {
          "line": 2,
          "column": 3
        }
      ],
      "path": [
        "getSingleUser"
      ]
    }
  ]
}
テスト
Grapheneでは、Grapheneアプリをテストするためのテストクライアントが提供されています。
準備
pytestを使用するので、requirements.txtに依存関係を追加する必要があります。
fastapi==0.61.1
uvicorn==0.12.2
orator==0.9.9
psycopg2-binary==2.8.6
graphene==2.1.8
graphene-pydantic==0.1.0
pytest==6.1.1 # 追加
インストール
$ pip install -r requirements.txt
テスト前処理の作成
次に、プロジェクトルートに「test」フォルダーを作成し、配下にconftest.pyファイルを追加します。
ここでは、テスト実行前に実行したい処理を記述します。
import graphene
import pytest
from graphene.test import Client
from orator import DatabaseManager, Model, Schema
from orator.migrations import DatabaseMigrationRepository, Migrator

from models.comment import Comments
from models.post import Post
from models.user import User
from schema import Query, Mutation


@pytest.fixture(autouse=True)
def setup_database():
    DATABASES = {
        "sqlite": {
            "driver": "sqlite",
            "database": "test.db"
        }
    }

    db = DatabaseManager(DATABASES)
    Schema(db)

    Model.set_connection_resolver(db)

    repository = DatabaseMigrationRepository(db, "migrations")
    migrator = Migrator(repository, db)

    if not repository.repository_exists():
        repository.create_repository()

    migrator.reset("migrations")
    migrator.run("migrations")


@pytest.fixture(scope="module")
def client():
    client = Client(schema=graphene.Schema(query=Query, mutation=Mutation))
    return client


@pytest.fixture(scope="function")
def user():
    user = User()
    user.name = "John Doe"
    user.address = "United States of Nigeria"
    user.phone_number = 123456789
    user.sex = "male"
    user.save()

    return user


@pytest.fixture(scope="function")
def post(user):
    post = Post()
    post.title = "Test Title"
    post.body = "this is the post body and can be as long as possible"

    user.posts().save(post)
    return post


@pytest.fixture(scope="function")
def comment(user, post):
    comment = Comments()
    comment.body = "This is a comment body"

    user.comments().save(comment)
    post.comments().save(comment)

    return comment
以下では、コードの詳細について説明します。
データベース用フィクスチャについて
ここでは、データベースの設定やマイグレーション適用のテストを定義しています。
@pytest.fixture(autouse=True)
def setup_database():
    DATABASES = {
        "sqlite": {
            "driver": "sqlite",
            "database": "test.db"
        }
    }

    db = DatabaseManager(DATABASES)
    Schema(db)

    Model.set_connection_resolver(db)

    repository = DatabaseMigrationRepository(db, "migrations")
    migrator = Migrator(repository, db)

    if not repository.repository_exists():
        repository.create_repository()

    migrator.reset("migrations")
    migrator.run("migrations")
@pytest.fixtureデコレータの引数にautouseをTrueで指定することで、テスト関数の実行前に実行される関数を定義することができます。
setup_database関数は、それぞれのテスト関数実行前に呼び出され、データベースが初期化されるような処理を行います。
Grapheneクライアント用フィクスチャについて
Grapheneテストクライアントを作成するためのフィクスチャです。
@pytest.fixture(scope="module")
def client():
    client = Client(schema=graphene.Schema(query=Query, mutation=Mutation))
    return client
引数で指定しているscopeは、フィクスチャが実行される粒度を制御することができます。
| スコープ名 | 実行粒度 |
|---|---|
| function | テストケースごとに1回実行(デフォルト) |
| class | テストクラス全体で1回実行 |
| module | テストファイル全体で1回実行 |
| session | テスト全体で1回だけ実行 |
その他フィクスチャについて
ユーザー、投稿、コメント情報を作成するためのフィクスチャです。
@pytest.fixture(scope="function")
def user():
    user = User()
    user.name = "John Doe"
    user.address = "United States of Nigeria"
    user.phone_number = 123456789
    user.sex = "male"
    user.save()

    return user


@pytest.fixture(scope="function")
def post(user):
    post = Post()
    post.title = "Test Title"
    post.body = "this is the post body and can be as long as possible"

    user.posts().save(post)
    return post


@pytest.fixture(scope="function")
def comment(user, post):
    comment = Comments()
    comment.body = "This is a comment body"

    user.comments().save(comment)
    post.comments().save(comment)

    return comment
テストの作成
test_query.pyというテストファイルを作成し、次のようにユーザーモデルのテストを追加します。
def test_create_user(client):
    query = """
    mutation {
        createUser(userDetails: {
            name: "Test User",
            sex: "male",
            address: "My Address",
            phoneNumber: "123456789",
        })
        {
            id
            name
            address
        }
    }
    """

    result = client.execute(query)
    assert result['data']['createUser']['id'] == 1
    assert result['data']['createUser']['name'] == "Test User"


def test_get_user_list(client, user):
    query = """
    query {
        listUsers {
            name
            address
        }
    }
    """

    result = client.execute(query)
    assert type(result['data']['listUsers']) == list


def test_get_single_user(client, user):
    query = """
    query {
        getSingleUser(userId: %s){
            address
        }
    }
    """ % user.id
    result = client.execute(query)

    assert result['data']['getSingleUser'] is not None
    assert result['data']['getSingleUser']['address'] == user.address
テストの実行
次のコマンドを使用して、pytestでテストを実行します。
$ python -m pytest -s test
コマンド実行後、すべてのテスト項目が実行されます。
================================================ test session starts ================================================
platform linux -- Python 3.9.1, pytest-6.1.1, py-1.10.0, pluggy-0.13.1
rootdir: /home/taro/Workspace/Python/fastapi-graphql
collected 3 items

test/test_query.py ...
=========================================== 3 passed in 0.51s =======================================================
テストは無事パスしました🎉🎉
まとめ
FastAPI、Orator ORMやpytestを使用してGraphQLAPIを開発し、さらに、テストする方法について説明しました。
FastAPIでは標準で型ヒントやバリデーションが提供されているので、Pydanticを用いたGraphQL API開発とは相性が良さそうです。
明日は、ZOZOテクノロジーズ アドベントカレンダー#2 @yokawasa さんによる記事です!お楽しみに!
Register as a new user and use Qiita more conveniently
- You can follow users and tags
- you can stock useful information
- You can make editorial suggestions for articles


0 コメント:
コメントを投稿